

Settings Menu

Configures programs and changes operational
patterns for the software. On the navigation menu, touch  , and then touch
  .
.
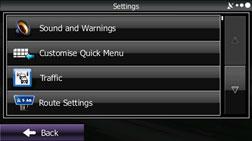
The Settings menu contains a variety of
options. Touch  or scroll
the list with your finger to view the entire list.
or scroll
the list with your finger to view the entire list.
 :
:
Performs volume adjustment or changes the voice guidance language. Also enables various warnings and warning settings. Sound and Warnings
 :
:
Allows you to set Quick menu items to suit your needs. Touch the button you want to change, and then select another function from the list. Customise Quick Menu
 :
:
The recommended route between two points is not always the same. Even when offline, statistics on traffic information (prior traffic data or traffic patterns) are gathered in the main unit, and when data is available, a route is searched for taking into account statistics relating to the day, week, and time. Additionally, real-time traffic information (TMC) is also available, allowing you to avoid traffic jams due to temporary road closures or accidents.
This has an impact on any function for which data is available. Traffic
 :
:
Sets the route search method. Select the type of vehicle you are using, the road category to use for the route search, and the route search method. Route Settings
 :
:
Fine tunes the Map screen appearance. Performs adjustments for your selected map display, selects from a list of colour designs used for daytime and nighttime, turns the path log on or off, and manages the spot display categories (allows you to select the type of spot displayed on the map). Map Settings
 :
:
Changes settings related to Map screen guidance. Visual Guidance
 :
:
Sets display units and the date display. Units and Formats
 :
:
Contains useful information on the user's distance moved in the trip logs and path logs. You can save trip logs automatically by turning this setting on, or save them manually when arriving at a destination. Trip Monitor
 :
:
Changes basic software configurations set during the initial setup process. See step 3 in Navigation settings.
Sound and Warnings
Performs volume adjustment or changes the voice guidance language. Also enables various warnings and warning settings.

Be sure to set the volume of the audio at an appropriate level. Improper volume setting may result in hearing damage or a traffic accident.
 :
:
Touch this button to adjust various volumes in the application. The type and buttons for various different volumes is displayed on a new screen. See the following items for more details.
 :
:
This button displays the current language for voice guidance. Touch this button to select a new language/narrator from the available languages and list of narrators. When you touch an item from the list, a sample of the audio is played back. Touch
 after selecting a new voice language.
 :
:
Touch this button to select the frequency of voice information, as well as turning on or off various voice information such as information on traffic conditions.
 :
:
You can select the Verbosity Level from “Minimal”, “Compact”, or “Verbose”.
 :
:
Touch this button to turn on or off talk back voice recognition results, or change the voice recognition method.
 :
:
The map may include information on speed limits for different sections of the road. This can generate warnings if you go over the current speed limit. This information may not be available in your region, and may not be accurate for all road maps. Here you can set whether you want to receive a warning display or an audio warning.
You can adjust the slider to set the speed at which a warning is generated.
The following warning types are available.
Voice warnings:
If the speed limit is exceeded by a certain percentage, a male voice utters a warning.
Display warnings:
If you go over the current speed limit, the speed limit is displayed on the map.
Here you can set whether or not to always display speed limits on the map (normally they are only displayed if you go over the speed limit).
 :
:
Displays driver warning information on the map. Touch this button to turn these warnings on or off, and set how far from the danger the warning should be generated. You can make individual settings for each type of warning.
 :
:
Displays driver warning information on the map. Touch this button to turn these warnings on or off, and set how far from the danger the warning should be generated. You can make individual settings for each type of warning.
You can adjust the volume for the following voice categories.
Guidance:
Changes the volume for the guidance voice (when guiding using a narrator).
Alert Beeps:
Changes the volume for audio warnings (the beep).
Adjustment buttons for each audio classification:
Volume slider:
Adjusts the volume of the associated audio.
Customise Quick Menu
Allows you to set Quick menu items to suit your needs. Quick menu Touch the button you want to change, and then select another function from the list.
Button | Explanation | Primary Location |
|---|---|---|
| Touch this button to search around a point on the route, or your current position (when a route search has not been performed). | Find / Find Places / Quick Search Selecting the destination from your favourite spots (POI: Point Of Interest) |
| Touch this button to select an item from the destination list. | Find / Favourite Selecting the destination from the destination list |
| Touch this button to select previously set destinations from the history list. | Find / History Selecting a frequently used destination (Smart History) |
| Touch this button to change the route. | My Route / Create (Edit) Route Setting a new starting point for the route |
| Touch this button to change route related settings. | More / Settings / Route Settings Route Settings |
| Touch this button to change map related settings. | More / Settings / Map Settings Map Settings |
| Touch this button to display a special screen with a button that searches for information on your current position and determines the nearest emergency assistance or road-side assistance. See the following section for more details. | N/A |
| Touch this button to clear the route and cancel navigation. This button is available when only one destination is set. | My Route / Cancel Route Cancelling Route Navigation |
| Touch this button to remove the next waypoint from the route. When multiple destinations are set, the previous waypoint is displayed. This button is available when only two or more destinations are set. | N/A |
| Reduces the scale of the 2D map to display the entire route. | My Route / Overview Displaying the Entire Route on the Map |
| Opens the Visual Guidance settings screen. | More / Settings / Visual Guidance Visual Guidance |
| Opens the overall traffic conditions screen. | Touch the navigation menu or the Map screen's road icons. |
| Avoids part of the recommended route. | My Route / Avoidances |
| Opens the trip monitor screen from which you can manage your saved trip logs and path logs. | More / Trip Monitor “More” Menu |
| Opens a list of changes in the route (distances). | Touch the top of the Map screen during navigation. |
| The route being navigated is saved to be used later. | My Route / More / Save Route |
| Changes to a saved, previously navigated route. | My Route / More / Load Route |
| Searches for your favourite spots using a variety of methods. | Find / Find Places Selecting the destination from your favourite spots (POI: Point Of Interest) |
| The Map screen opens and a simulation of the route being navigated starts. | My Route / More / Simulate Navigation Displaying a Simulation of the Route |
| Opens the GPS information screen showing satellite positions and signal strength. | Touch the top of the Map screen if there is no GPS reception. |


 /
/


Traffic
The recommended route between two points is not always the same. Even when offline, statistics on traffic information (prior traffic data or traffic patterns) are gathered in the main unit, and when data is available, a route is searched for taking into account statistics relating to the day, week, and time. Additionally, real-time traffic information (TMC) is also available, allowing you to avoid traffic jams due to temporary road closures or accidents.
This has an impact on any function for which data is available.
 :
:
Turns on or off the traffic information display.
 :
:
Set to use real-time traffic information when searching for a route. When searching for a new route, or when it is necessary to search again based on the traffic information received, it searches for merits to avoiding the current traffic conditions.
Set so that confirmation is needed every time you perform another search by delaying the timing when the search is remade.
 :
:
When this button is touched, routes that do not satisfy traffic conditions are not searched.
 :
:
When this button is touched, routes that satisfy traffic conditions are searched.
Time slider:
Adjust the timing before starting another route search. (You can set 0 to 60 every 5 minutes)
 :
:
You can turn the route confirmation display on or off for each new search.
 :
:
Touch this button to open a list of types of traffic conditions, and select the events to take into consideration when searching for a route.
Settings button for each type of traffic condition
 :
:
You can select “Considered” or “Ignored” when searching for a route.
 :
:
You can turn the icon display on the map on or off.
Route Settings
Sets the route search method.
 :
:
Sets various factors to take into account when performing a search, such as fuel consumption, vehicle model, fuel costs, and maximum speeds on normal roads and motorways.
 :
:
You can change between On-road and Off-road.
Set to On-road to perform normal navigation, or set to Off-road to navigate using the straightest possible route to the destination.
 :
:
By changing the route search method, you can search for the optimum route for a variety of situations and types of vehicle. See the following items for more details.
You can set which road categories to include or to avoid in the route to match the user's preferences.
Avoiding a road category is simply a matter of changing the priority level. This does not mean that the selected road category will never be used. If the navigation cannot reach the destination without using a road category that should be avoided, the road category will be used, but only as little as possible. If this does happen, a warning icon is displayed on the My Route screen, and the part of the route that uses a road category that should be avoided is displayed on the map in another colour.
In the road category list you can check the number of sections used for each road category on the current route and the overall distance.
 :
:
Select whether or not to use the motorway when creating the route.
 :
:
Select whether or not to use toll roads (Period Charge) when creating the route.
 :
:
Select whether or not to use toll roads (Per-use Toll) when creating the route.
 :
:
Select whether or not to use ferries when creating the route.(However, ferries might not always be selected for the route.)However, information on temporary service ferries may not be displayed on the map. There may be a fee for using the ferry.
 :
:
Select whether or not to use 4WD tracks when creating the route.
 :
:
Select whether or not to consider energy efficiency when creating the route.
Type of route search method:
 :
:
Searches all roads for the quickest route following the speed limits of the roads.
 :
:
Searches for the route that conserves the most energy, taking into account the merits of “Fast” and “Short”.
 :
:
Searches for the shortest distance in all possible routes.
 :
:
Searches for a route that is easiest to drive, with few right and left turns. Using this option, the program allows you to avoid combinations of smaller roads and to take the motorway.
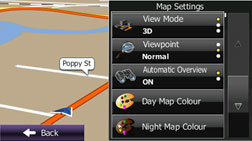
Map Settings
Fine tunes the Map screen appearance. Performs adjustments for your selected map display, selects from a list of colour designs used for daytime and nighttime, turns the path log on or off, and manages the spot display categories (allows you to select the type of spot displayed on the map).
Because the map is displayed on the screen, you can check the results as you change settings.
 :
:
Select the display mode from a 3D bird's-eye view, a 2D heads-up flat view, or a 2D North Up flat view.
 :
:
You can adjust the standard zoom and the angle of tilt to suit your needs. You can set the level in three stages.
 :
:
Automatically reduces the scale of the 2D map to display the entire route. You can turn this function on and off.
 :
:
Select the screen colour used in daytime mode.
 :
:
Select the screen colour used in nighttime mode.
 :
:
Show or hide 3D landmarks, 3D designs, or block diagrams represented as easy to see icons, or plain icons.
 :
:
Show or hide actual building dimensions and positions on the map, representing all urban buildings as 3D landmarks, 3D designs, or block diagrams.
 :
:
Turns the path log save function on or off (saves in positional order for each trip).
 :
:
Select a spot displayed on the map during navigation. We recommend reducing the number of spots displayed as much as possible as the map is difficult to see if there are too many spots. Because of this, the software is designed to allow multiple spot displays. Follow the steps below.
Touch the check box to show or hide the spot category.
Touch the spot category name to open a sub-category.
Touch
to save the currently displayed spot
position, or read spot displays saved previously. You can also restore
the default display settings.
Visual Guidance
Changes settings related to Map screen guidance.
 :
:
You can set the data fields displayed at the corner of the Map screen to match your needs. Touch this button and select the guidance you want to display. Values may differ when driving without having set a destination in route navigation. You can select current speed or altitude and so on for a standard trip data, or select route data related to the final destination or the next waypoint on the route.
 :
:
Displays service area information while driving on the motorway. You can turn this function on and off.
 :
:
Touch this button and select the service area information display items you want to display.
 :
:
When information is available, lane information similar to overhead road traffic signs is displayed at the top of the map. You can turn this function on and off.
 :
:
When approaching an motorway exit or a complicated intersection, the map switches to a 3D display if the necessary information can be displayed.
 :
:
Turns on the route progress bar which is displayed as a straight line to the left of the map. This shows the progress made on the current route. When a blue arrow is used to indicate position, the arrow continues to rise as you drive towards your destination. Waypoints and traffic conditions are displayed on the line.
Units and Formats
Sets display units and the date display.
- :
Sets the units used by the program to measure distance. Voice guidance languages do not support all units displayed in the list.
You can select to display the time in various international date formats.
Types of display units and date display settings:
 :
:
Switches the units used to display distance.
 :
:
Switches the units used to display fuel consumption.
 :
:
Displays the keyboard screen allowing you to enter the currency name. (For the keyboard, see Using the keyboard.)
 :
:
Switches the units used to display the date.
 :
:
Switches the date delimiter.
 :
:
Switches the coordinate display format.
Trip Monitor
Contains useful information on the user's distance moved in the trip logs and path logs. You can save trip logs automatically by turning this setting on, or save them manually when arriving at a destination. You can view all logs on the trip monitor. Launch the trip monitor from the “Others” menu.
 :
:
The trip monitor saves statistical data for the distance travelled. You can set it so that the route is saved automatically if you need a log after driving.
Trip Database Size:
This is not a button. This line indicates the current size of the trip database. This shows the total for all saved trip logs and path logs.
 :
:
You can save path logs (positional order acquired from GPS receiver) in the trip log.
