

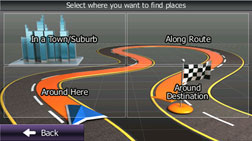
Select route destination

You can use any of the following methods to select the destination.
Enter all or part of the address. For example: Instead of entering the address, you can just enter the name of the street or intersection.
Enter the address by using the Postcode. Using a Postcode This allows you to search for the street name quickly, even if you have not selected a district name.
Use one of your pre-entered favourite spots as the destination. Selecting the destination from your favourite spots (POI: Point Of Interest)
Use the Find on Map function to select a destination. Selecting a map position as the destination
Use the list of previously saved destinations. Selecting the destination from the destination list
You can select a destination from the history of previous destinations. Selecting a frequently used destination (Smart History), Selecting a recent destination from History
Enter all or part of the address
Entering part of the address is the quickest way to select the destination for your route.
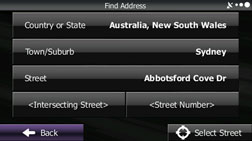
You can specify the address by entering the following items on the same screen.
An accurate address, such as the street number
City/town centre
Intersection
Street name
Enter any of the items above, and then search using the Postcode Using a Postcode
Entering an address
Follow the steps below to enter an address as the destination.
If the Map screen is displayed, touch
 to return to the navigation menu.
On the navigation menu, touch
 .
.
Touch
 .
.
By default, the country and district for your current position are displayed. If necessary, touch
 and then enter the first few letters
of the country name. You can then select the country from the list
displayed.
and then enter the first few letters
of the country name. You can then select the country from the list
displayed.
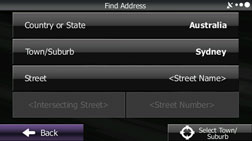
If necessary, select the city/town again.
| Touch |
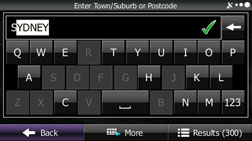
| Use the keyboard to enter the start of the city/town.
|
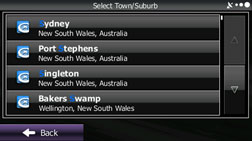
| Follow the steps below to find the city/town you entered.
|

 .
.

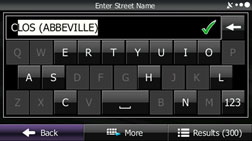
Enter the street name as follows.
| Touch |
| Use the keyboard to enter the start of the street name.
|
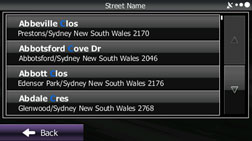
| Find the street name to enter as follows.
|
 .
.
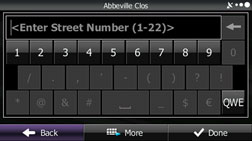
Enter the street number as follows.
| Touch |
| Enter the street number with the keyboard.(Enter
the number(s), and then touch
|
| Touch |
 .
. .)
.)
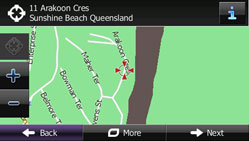
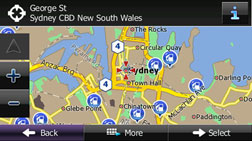
The map is displayed in full-screen mode with the selected point at the centre. If necessary, you can touch another point on the map to change the destination. The cursor (
 ) is displayed at the new position.
Touch
) is displayed at the new position.
Touch  to set the destination,
or touch
to set the destination,
or touch  to select another
destination.
to select another
destination.
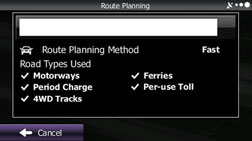
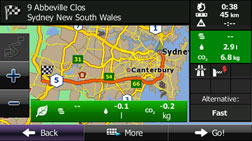
After a summary of the route plan is displayed, the entire route is displayed on the map. The route is researched automatically. Touch
 to
change the route plan, or touch
to
change the route plan, or touch  to start navigation. (When the countdown
is displayed in the “Go!” button, guidance begins
automatically after 10 seconds even if you do not touch the button.)
to start navigation. (When the countdown
is displayed in the “Go!” button, guidance begins
automatically after 10 seconds even if you do not touch the button.)

If the destination will be used frequently, you can save it to the destination list as follows before touching
. Touch , and then touch  . Enter a name for the destination you
want to save, and then touch
. Enter a name for the destination you
want to save, and then touch  . You are automatically returned to the map with the destination
set. Start driving following the navigation.
. You are automatically returned to the map with the destination
set. Start driving following the navigation.
Entering the centre of the street as the destination
If you do not know the street number, you can navigate by setting the centre of the street as the destination.
If the Map screen is displayed, touch
to return to the navigation menu.
On the navigation menu, touch
.
Touch
.
If necessary, change the country and district as mentioned above. Entering an address
Enter the street name as follows.
| Touch |
| Use the keyboard to enter the start of the street name.
|
| Find the street name to enter as follows.
|
Touch
 without entering an address. The centre
of the street is selected as the destination.
without entering an address. The centre
of the street is selected as the destination.
The map is displayed in full-screen mode with the selected point at the centre. If necessary, you can touch another point on the map to change the destination. The cursor (
) is displayed at the new position.
Touch to set the destination,
or touch to select another
destination.
After a summary of the route plan is displayed, the entire route is displayed on the map. The route is researched automatically. Touch
to
change the route plan, or touch to start navigation. (When the countdown
is displayed in the “Go!” button, guidance begins
automatically after 10 seconds even if you do not touch the button.)
Selecting an intersection as the destination
Follow the steps below to enter an intersection as the destination.
If the Map screen is displayed, touch
to return to the navigation menu.
On the navigation menu, touch
.
Touch
.
If necessary, change the country and district as mentioned above. Entering an address
Enter the street name as follows.
| Touch |
| Use the keyboard to enter the start of the street name.
|
| Find the street name to enter as follows.
|
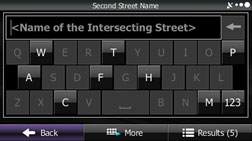
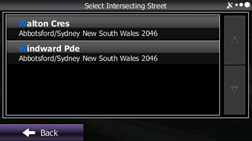
Enter the intersection name as follows.
Touch
 .
.
If there are only a few roads at the intersection, the list is displayed immediately.
If the road is a long way off, the keyboard screen is displayed. Use the keyboard to enter the start of the intersection name. (For the keyboard, see Using the keyboard.) A list is automatically displayed when the entered road name matches and can be displayed on one screen. Select from the list.
The map is displayed in full-screen mode with the selected point at the centre. If necessary, you can touch another point on the map to change the destination. The cursor (
) is displayed at the new position.
Touch to set the destination,
or touch to select another
destination.
After a summary of the route plan is displayed, the entire route is displayed on the map. The route is researched automatically. Touch
to
change the route plan, or touch to start navigation. (When the countdown
is displayed in the “Go!” button, guidance begins
automatically after 10 seconds even if you do not touch the button.)
Selecting a city/town centre as the destination
The centre of the city/town is not the geographical centre of the city/town, but a location set by the cartographer. In towns and villages, this is usually the most important intersection, while in larger cities it is selected from multiple important intersections.
If the Map screen is displayed, touch
to return to the navigation menu.
On the navigation menu, touch
.
Touch
.
If necessary, change the country and district as mentioned above. Entering an address
Select the city/town as follows.
| Touch |
| Use the keyboard to enter the start of the city/town.
|
| Follow the steps below to find the city/town you entered.
|
Touch
 without entering the street name. Set
the city/town centre displayed as the route's destination.
without entering the street name. Set
the city/town centre displayed as the route's destination.
The map is displayed in full-screen mode with the selected point at the centre. If necessary, you can touch another point on the map to change the destination. The cursor (
) is displayed at the new position.
Touch to set the destination,
or touch to select another
destination.
After a summary of the route plan is displayed, the entire route is displayed on the map. The route is researched automatically. Touch
to
change the route plan, or touch to start navigation. (When the countdown
is displayed in the “Go!” button, guidance begins
automatically after 10 seconds even if you do not touch the button.)
Using a Postcode
By entering the Postcode, you can perform the address search mentioned above, even if you do not know the district name. The following is an example of entering an accurate address.
If the Map screen is displayed, touch
to return to the navigation menu.
On the navigation menu, touch
.
Touch
.
If necessary, change the country as mentioned above. Entering an address
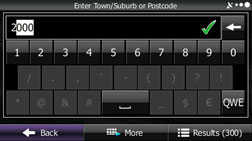
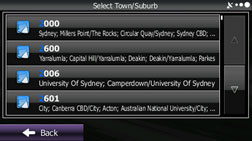
Enter the city/town by using the Postcode.
| Touch |
| Touch |
| Start entering the Postcode. |
| Follow the steps below to find the city/town you entered.
|
 to open the number pad.
Enter the street name as follows.
| Touch |
| Use the keyboard to enter the start of the street name.
|
| Find the street name to enter as follows.
|
Enter the street number as follows.
| Touch |
| Enter the street number with the keyboard.(Enter
the number(s), and then touch
|
| Touch |
The map is displayed in full-screen mode with the selected point at the centre. If necessary, you can touch another point on the map to change the destination. The cursor (
) is displayed at the new position.
Touch to set the destination,
or touch to select another
destination.
After a summary of the route plan is displayed, the entire route is displayed on the map. The route is researched automatically. Touch
to
change the route plan, or touch to start navigation. (When the countdown
is displayed in the “Go!” button, guidance begins
automatically after 10 seconds even if you do not touch the button.)
Hints for quick address entry
When entering a city/town name or a street name:
Only characters that can be displayed in the search results are shown on the keyboard. Other characters are greyed out.
While entering text, the most likely search result is always displayed in the text entry field. If the search result is correct, touch
 to select it.
If you touch
 after entering
two characters, items that contain those two characters are displayed
in the list.
after entering
two characters, items that contain those two characters are displayed
in the list.
You can find intersections easily by using the following method.
First, when searching for an uncommon road name, you only need to enter the first few letters to acquire the name.
When one street name is shorter than the other, the shorter one is searched for first. This shortens the search time for the road with the longer name.
You can search by road category as well as road name. When the same word is included in names such as the street, road, and main street, by entering the first character for the type of road, you can quickly bring up the search results. For example, if you are searching for “Pine Avenue” and you enter “Pi A”, roads such as “Pine Street” or “Pickwick Road” are not displayed.
You can also search by using the Postcode. If the Postcode only contains a few characters, you can search more quickly than when entering the city/town name.
Selecting the destination from your favourite spots (POI: Point Of Interest)
You can select your destination from the favourite spots that have already been saved in the software.
You can use the same screen to find a spot using the following various methods.
Using the quick search function, you can quickly search for spots around the name.
Using the preset search function, you can search for the most popular spots with a few quick touches.
Search using spot categories.
Search using spot names.
You can also search for special services from the “Where Am I?” screen.
Performing a quick search for favourite spots
Using the quick search function, you can quickly search for spots by name. You can use the following search items.
Around the recommended route (when a recommended route is available)
Around the current location (when no destination is set)
Follow the steps below to start a quick search.
If the Map screen is displayed, touch
 and then touch
  .
.
If the navigation menu is displayed, touch
,  , and then touch
  .
.
Use the keyboard to enter the start of the spot name.
For the keyboard, see Using the keyboard.
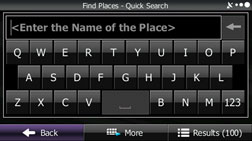
Touch
after entering the first few characters
to open a list of spot names that include the characters you entered.

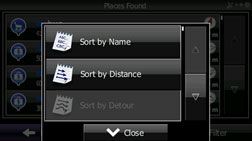
(Optional) You can display spots on the list in name order, in order of the distance from the current position or previously confirmed position, or in order of necessary detour distance (during navigation). If you want to change the order in which entries are presented in the list, touch
and select the style that you want.
Also, you can display all of the spots on the list on the map.
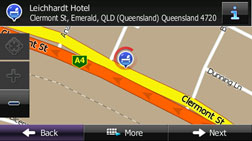
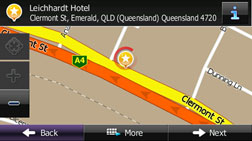
Find the item you want on the list, and then touch that item. The map is displayed in full-screen mode with the selected point at the centre. The name and address of the spot are displayed at the top of the screen.
(Optional) Touch
 to display details about the selected
spot. Touch to return
to the map.
to display details about the selected
spot. Touch to return
to the map.
If necessary, you can touch another point on the map to change the destination. The cursor (
) is displayed at the new position.
Touch to set the destination,
or touch to select another
destination.
After a summary of the route plan is displayed, the entire route is displayed on the map. The route is researched automatically. Touch
to
change the route plan, or touch to start navigation. (When the countdown
is displayed in the “Go!” button, guidance begins
automatically after 10 seconds even if you do not touch the button.)
Searching for favourite spots using a preset category
By using the preset search function, you can quickly selected popular spots.
If the Map screen is displayed, touch
to return to the navigation menu.
On the navigation menu, touch
.
Touch
.
Display preset search categories as follows.
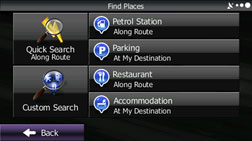
 :
:
Searches for petrol stations along the route during route navigation.
Searches around the current position if navigation is not being performed (if no destination is set).
Searches the area around the last confirmed position if the current position is unavailable (no GPS signal).
 :
:
Searches for parking lots at the destination during route navigation.
Searches around the current position if navigation is not being performed (if no destination is set).
Searches the area around the last confirmed position if the current position is unavailable (no GPS signal).
 :
:
Searches for restaurants along the route during route navigation.
Searches around the current position if navigation is not being performed (if no destination is set).
Searches the area around the last confirmed position if the current position is unavailable (no GPS signal).
 :
:
Searches for accommodation at the destination during route navigation.
Searches around the current position if navigation is not being performed (if no destination is set).
Searches the area around the last confirmed position if the current position is unavailable (no GPS signal).
Press the Favourites Quick Search button to display a basic list of spots.
(Optional) You can display spots on the list in name order, in order of the distance from the current position or previously confirmed position, or in order of necessary detour distance (during navigation). If you want to change the order in which entries are presented in the list, touch
and select the style that you want.
Also, you can display all of the spots on the list on the map.
Find the item you want on the list, and then touch that item. The map is displayed in full-screen mode with the selected point at the centre. The name and address of the spot are displayed at the top of the screen.
(Optional) Touch
to display details about the selected
spot. Touch to return
to the map.
If necessary, you can touch another point on the map to change the destination. The cursor (
) is displayed at the new position.
Touch to set the destination,
or touch to select another
destination.
After a summary of the route plan is displayed, the entire route is displayed on the map. The route is researched automatically. Touch
to
change the route plan, or touch to start navigation. (When the countdown
is displayed in the “Go!” button, guidance begins
automatically after 10 seconds even if you do not touch the button.)
Searching for a favourite spot by category
You can search for favourite spots by category or sub-category.
If the Map screen is displayed, touch
to return to the navigation menu.
On the navigation menu, touch
.
Touch
.
Touch
 .
.
Select the spot area you want to search for as follows.
Touch
 or
or  to search around your current position,
or the latest confirmed position.
to search around your current position,
or the latest confirmed position.
Touch
 to search for city/town spots.
Touch
 to search for spots at the destination
during route navigation.
to search for spots at the destination
during route navigation.
Touch
 to search along the route being navigated, rather than around an
optional point. This is useful when you want to search for a petrol
station or restaurant and so on along the route taking the smallest
detour to get there.
to search along the route being navigated, rather than around an
optional point. This is useful when you want to search for a petrol
station or restaurant and so on along the route taking the smallest
detour to get there.
If you select
, you can select
a city/town displayed by the search.
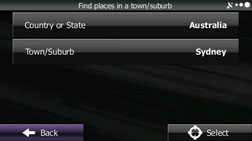
See Entering an address for information about how to select a “Country or State” or “Town/suburb”.
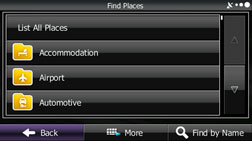
By selecting a main category (such as accommodations), or by touching
 , the entire list of spots around the
position you selected or along the route is displayed.
, the entire list of spots around the
position you selected or along the route is displayed.
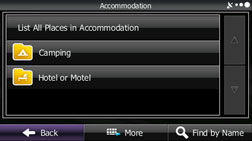
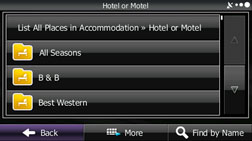
By selecting a sub-category (such as hotels or motels) from the main category, or by touching
, the entire list of spots around the
position you selected or along the route is displayed.
Brand names of services may also be displayed depending on the sub-category of the selected spot. By selecting a brand name, or by touching
, the entire list of spots around the position you selected or along
the route is displayed.
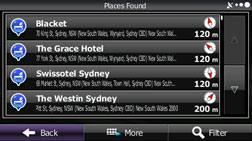
The final search results are displayed as a list.
(Optional) You can display spots on the list in name order, in order of the distance from the current position or previously confirmed position, or in order of necessary detour distance (during navigation). If you want to change the order in which entries are presented in the list, touch
and select the style that you want.
Also, you can display all of the spots on the list on the map.
Find the item you want on the list, and then touch that item. The map is displayed in full-screen mode with the selected point at the centre. The name and address of the spot are displayed at the top of the screen.
(Optional) Touch
to display details about the selected
spot. Touch to return
to the map.
If necessary, you can touch another point on the map to change the destination. The cursor (
) is displayed at the new position.
Touch to set the destination,
or touch to select another
destination.
After a summary of the route plan is displayed, the entire route is displayed on the map. The route is researched automatically. Touch
to
change the route plan, or touch to start navigation. (When the countdown
is displayed in the “Go!” button, guidance begins
automatically after 10 seconds even if you do not touch the button.)
Searching for a favourite spot by name
You can search for a favourite spot by name. You can search the entire spot database or select a category/sub-category for another location or for the route being navigated.
If the Map screen is displayed, touch
to return to the navigation menu.
On the navigation menu, touch
.
Touch
.
Touch
.
Select the spot area you want to search for as follows.
Touch
or to search around your current position,
or the latest confirmed position.
Touch
to search for city/town spots.
Touch
to search for spots at the destination
during route navigation.
Touch
to search along the route being navigated, rather than around an
optional point. This is useful when you want to search for a petrol
station or restaurant and so on along the route taking the smallest
detour to get there.
If you select
, you can select
a city/town displayed by the search.
See Entering an address for information about how to select a “Country or State” or “Town/suburb”.
By selecting a main category (such as accommodations), or by touching
 , you can search all spots.
By selecting a sub-category (such as hotels or motels) from the main category, or by touching
, you can search in the main category
you selected.
Touch
to search a sub-category of the selected
spot.
Use the keyboard to enter the start of the spot name.
For the keyboard, see Using the keyboard.
Touch
after entering the first few characters
to open a list of spot names that include the characters you entered.
Find the item you want on the list, and then touch that item. The map is displayed in full-screen mode with the selected point at the centre. The name and address of the spot are displayed at the top of the screen.
(Optional) Touch
to display details about the selected
spot. Touch to return
to the map.
If necessary, you can touch another point on the map to change the destination. The cursor (
) is displayed at the new position.
Touch to set the destination,
or touch to select another
destination.
After a summary of the route plan is displayed, the entire route is displayed on the map. The route is researched automatically. Touch
to
change the route plan, or touch to start navigation. (When the countdown
is displayed in the “Go!” button, guidance begins
automatically after 10 seconds even if you do not touch the button.)
Using “Where Am I?” to select the closest assistance service
You can search for the closest assistance service by using the “Where Am I?” screen.
Touch
on the Map screen to open the Quick
menu.
Touch
 , and then touch
  .
.
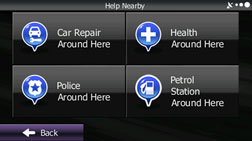
The preset search categories are displayed. This button searches for everything around your current position (or the latest confirmed position if it is unavailable).
 :
:
Vehicle repairs / Road-side assistance services
 :
:
Hospitals / Emergency services
 :
:
Police stations
 :
:
Petrol stations
Press any of the quick search buttons to display a basic list for the service you selected.
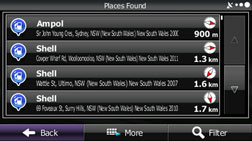
Find the item you want on the list, and then touch that item. The map is displayed in full-screen mode with the selected point at the centre. The name and address of the spot are displayed at the top of the screen.
(Optional) Touch
to display details about the selected
spot. Touch to return
to the map.
If necessary, you can touch another point on the map to change the destination. The cursor (
) is displayed at the new position.
Touch to set the destination,
or touch to select another
destination.
After a summary of the route plan is displayed, the entire route is displayed on the map. The route is researched automatically. Touch
to
change the route plan, or touch to start navigation. (When the countdown
is displayed in the “Go!” button, guidance begins
automatically after 10 seconds even if you do not touch the button.)
Selecting a map position as the destination
If the Map screen is displayed, touch
to return to the navigation menu.
On the navigation menu, touch
.
Touch
 .
.
Search for the destination on the map as follows. Move or enlarge/reduce the map as necessary.
Touch the position you want to select as the destination. The cursor (
) is displayed.
Touch
 to select the cursor as the destination.
After a summary of the route plan is displayed, the entire route is displayed on the map. The route is researched automatically. Touch
to
change the route plan, or touch to start navigation. (When the countdown
is displayed in the “Go!” button, guidance begins
automatically after 10 seconds even if you do not touch the button.)
Selecting the destination from the destination list
You can set a position that has been saved in the destination list as the destination.
See Editing the Destination List (Route Editing) for more details on registering a position to the destination list.
Display the destination list as follows.
If the Map screen is displayed, touch
and then touch  . (Only when registered to the Quick
Menu.)
. (Only when registered to the Quick
Menu.)
If the navigation menu screen is displayed, touch
and then touch .
The destination list is displayed.

Touch the position you want to select as the destination. If necessary, you can scroll through the list, or touch
 and enter a
few letters form the item name to search the list.
and enter a
few letters form the item name to search the list.
The map is displayed in full-screen mode with the selected point at the centre. If necessary, you can touch another point on the map to change the destination. The cursor (
) is displayed at the new position.
Touch to set the destination,
or touch to select another
destination.
After a summary of the route plan is displayed, the entire route is displayed on the map. The route is researched automatically. Touch
to
change the route plan, or touch to start navigation. (When the countdown
is displayed in the “Go!” button, guidance begins
automatically after 10 seconds even if you do not touch the button.)
Selecting a frequently used destination (Smart History)
Destinations that have been set previously are displayed in the History list. The two most recent destinations are displayed on the destination menu allowing you to select them easily. Smart History uses conditions such as the current time, date, and position, and displays a position in response to the user's navigation habits. The more you use the navigation system, the more accurate the anticipated destination becomes.
If the Map screen is displayed, touch
to return to the navigation menu.
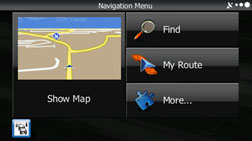
Touch
on the navigation menu.
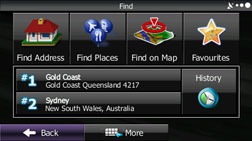
Touch destination
 or
or  in the History field.
The map is displayed in full-screen mode with the selected point at the centre. If necessary, you can touch another point on the map to change the destination. The cursor (
) is displayed at the new position.
Touch to set the destination,
or touch to select another
destination.
After a summary of the route plan is displayed, the entire route is displayed on the map. The route is researched automatically. Touch
to
change the route plan, or touch to start navigation. (When the countdown
is displayed in the “Go!” button, guidance begins
automatically after 10 seconds even if you do not touch the button.)
Selecting a recent destination from History
Destinations that have been set previously are displayed in the History list.
Use the History function as follows.
If the Map screen is displayed, touch
and then touch  .
.
If the navigation menu screen is displayed,
touch and then touch .
A list of recently entered destinations is displayed. A History search displays three destination on the top page based on previously entered routes (destinations with the highest likelihood of use). Other destinations are displayed based on the time they were entered in the past. If necessary, scroll through the list to display older entries and select the destination.
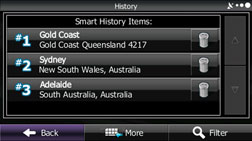
Select a destination from the list.
The map is displayed in full-screen mode with the selected point at the centre. If necessary, you can touch another point on the map to change the destination. The cursor (
) is displayed at the new position.
Touch to set the destination,
or touch to select another
destination.
After a summary of the route plan is displayed, the entire route is displayed on the map. The route is researched automatically. Touch
to
change the route plan, or touch to start navigation. (When the countdown
is displayed in the “Go!” button, guidance begins
automatically after 10 seconds even if you do not touch the button.)
Creating a route from the destination list (route creator)
You can create a route for each destination in the saved routes menu.
If the Map screen is displayed, touch
to return to the navigation menu.
Touch
 on the navigation menu.
Touch
 .
.
Only one row showing the route's start point (current position displayed) is displayed in the route point list.

Touch
 to select a destination.
When the destination menu is displayed, select the route's destination using the same method as described previously.
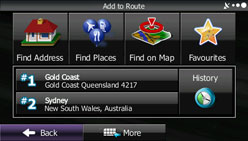
After selecting a new destination, you are returned to the list.
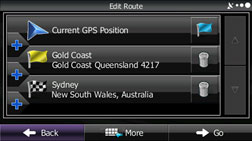
To add another destination, touch
at the point where you want to add
a new route point to the list, and repeat the steps above.
