

Map Screen

Navigating on the Map
In the navigation menu startup screen,
the currently active map is reduced and displayed in  .
.
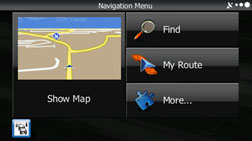
To enlarge the map, touch to open the Map screen.
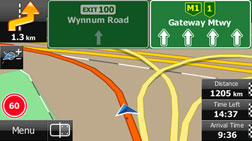
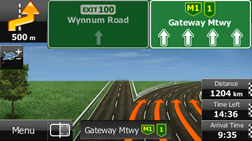
This map shows the current position (shown as the vehicle marked as a blue arrow), recommended routes (orange lines), and the immediate surrounding area.
When GPS positioning is not active, the vehicle marker is clear. The latest confirmed position is displayed.
Coloured spots are displayed on the circle around the satellite icon in the top left corner. The more spots there are on the circle, the higher the accuracy of the GPS positioning.
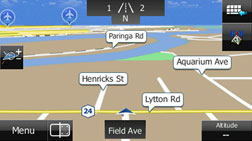
When GPS positioning is active, the vehicle marker is displayed in full-colour, and the current position is shown.

Buttons and data fields are displayed on the screen, and you can perform navigation. During navigation, route information is displayed on the screen.
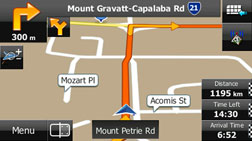
The data fields display differs when no destination is set during navigation (no orange line is displayed). When performing navigation, the number of the data fields displayed on the screen is three. Up to three data fields can be displayed when no destination is set (no orange line is displayed).
Default data fields when no destination is set while driving
Field | Explanation |
|---|---|
| Shows the altitude of the road currently being driven and measured by the GPS receiver. (There may be a maximum ±50 m of differences depending on the reception status of GPS satellites.) |
| When information is available on the map, displays the speed limit for the current road. |
| Displays the current time corrected using the time zone offset. Accurate time is acquired from the GPS satellite, while time zone information is acquired from the map. You can also make manual settings in Units and Formats. (Only for the Menu screen, the current time is shown in the bottom left corner of the screen.) |


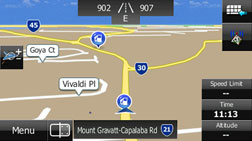
Default data fields when performing navigation (you can change the values in fields by using touch & hold):
Field | Explanation |
|---|---|
| Displays the distance on the route to the final destination. |
| Displays the time left until arrival at the final destination based on the information available for the remainder of the journey. This is calculated according to prior traffic data or traffic patterns when ever available. If a TMC receiver is connected to the main unit and is receiving data, any traffic jams along the route are also factored into calculations. However, the accuracy of these calculations varies greatly. |
| Displays the estimated arrival time at the final destination based on the information available for the remainder of the journey. This is calculated according to prior traffic data or traffic patterns when ever available. If a TMC receiver is connected to the main unit and is receiving data, any traffic jams along the route are also factored into calculations. However, the accuracy of these calculations varies greatly. |
| When information is available on the map, displays the speed limit for the current road. |
| Displays the current time corrected using the time zone offset. Accurate time is acquired from the GPS satellite, while time zone information is acquired form the map. You can also make manual settings in Units and Formats. (Only for the Menu screen, the current time is shown in the bottom left corner of the screen.) |
| Shows the altitude of the road currently being driven and measured by the GPS receiver. (There may be a maximum ±50 m of differences depending on the reception status of GPS satellites.) |
 *
*
 *
*Time and distance to the destination cannot be displayed when your vehicle is located in the place other than roads and motorways. After the vehicle returns to a road or motorway, time and distance are displayed.
Position marker
Vehicle Marker and Lock-on-Road
If GPS positioning is available, the current position is shown using the vehicle marker.
When any vehicle is selected, the vehicle marker may not display an accurate GPS position and direction of travel. If there is a road nearby, the GPS positioning error is corrected based on the shortest distance to the road to, and the direction of the icon is adjusted to match the direction of the road.
Selected map location (cursor)
Use one of the following methods to mark a map location.
Touch the map during navigation.
Touch the map when the destination you want is displayed in the search results.
Touch the map in “Map Search”. Selecting a map position as the destination
After selecting a map location, a cursor
is displayed at the point selected on the map. The cursor is displayed
as a red point ( ) and
can be checked at all zoom levels.
) and
can be checked at all zoom levels.
You can use the cursor's position as the route's destination, search for locations around the cursor, and save the position in the destination list.
Map objects
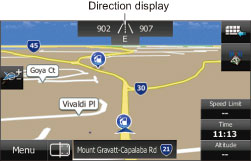
Direction display
If no destination is set while driving, the direction is shown on the screen in heads-up display.
Each letter indicates a direction: N (North), NE (North East), E (East), SE (South East), S (South), SW (South West), W (West), and NW (North West). However, this is not displayed while driving on an motorway.
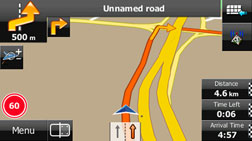
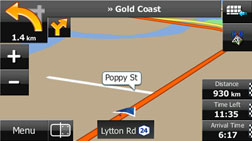
Advanced confirmation of route changes and next road
During navigation, information on the next route event (the next change in the route), as well as the next city or town, is displayed at the top of the Map screen.
The next change in the route is displayed in the field at the top left corner of the screen. Displays the type of route event (right or left turn, roundabout, motorway interchange, and so on) and the distance from the current position.
When the next route change approaches, the type of route change is displayed as a small icon next to the main icon. Only the next route change is displayed.
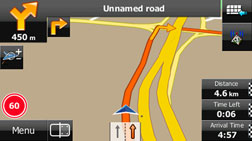
Most of these icons can be understood intuitively. The following table shows the most frequently displayed route events. The symbol design is the same in each field.
Icon | Explanation |
|---|---|
| Turn left |
| Turn right |
| U-turn |
| Keep right at the fork in the road. |
| Turn left & sharp curve. |
| Turn right & sharp curve. |
| Stay in the left lane. |
| Stay in the right lane. |
| Go straight ahead at the intersection. |
| Turn left at the T junction. |
| Go left at the roundabout. Third exit (next change in direction). |
| Join the roundabout (the route change after the next change). |
| Join the motorway. |
| Leave the motorway. |
| Board the ferry. |
| Disembark from the ferry. |
| You are half way to your destination. |
| You have arrived at your destination. |


Lane information & signs
When using route guidance on roads with two or more lanes, it is important that you drive in the correct lane. When lane information is available on the Map, the lane and direction are indicated below the map with small arrows. The lane that you should drive in is highlighted.
When detailed information is available, the arrows are removed and signs are displayed. Signs are displayed at the top of the map. The colour and design of the signs is the same as signs actually found at the side of the road or overhead signs. These signs show the district and the route number for the lane direction.
All signs are displayed in the same manner even when driving without using the navigation system. During navigation, only the sign that shows the lane in which you should drive is highlighted, the other signs are toned down.
Junction display
When approaching an motorway exit or a complicated intersection, the map switches to a 3D display if the necessary information can be displayed. An arrow indicates the lane in which you should drive. Signs are also displayed if the information is available.
Types of 3D objects
The following 3D object types are supported.
Type | Explanation |
|---|---|
3D Undulations | On a 2D map, the changes in topography or undulations in the ground are displayed; and when using 3D this data is used to create a route map image during navigation. On a 3D map, hills and mountains are displayed in the background, whilst on a 2D map they are expressed using changes in colour and shading. |
Elevated Roads | Complicated intersections and three dimensional road objects (such as overpasses or overhead bridges) are displayed in 3D. |
3D Landmark | 3D landmarks are realistic 3D representations of the most important landmarks in major cities, and 3D city maps contain block representations of buildings in the downtown areas of major cities. 3D landmarks are unique drawings representing the true look of buildings, while in 3D city maps, buildings are generated by the software from a database containing their shapes and sizes. Besides making the map view more attractive, these 3D features also help the user navigate in the complicated street network of large cities by providing easily recognisable reference points to the eye. |
Items displayed during route navigation
The route is displayed using the following methods.
Symbol | Name | Explanation |
|---|---|---|
| Current GPS position and departure point | Current location of the user displayed on the map
When the GPS position is available, the route usually starts from the current position. If there is no GPS position available, the last confirmed available GPS position is used as the departure point. |
| Waypoint (midway point) | The midway point target point before arrival at the target destination. |
| Destination (final point) | The final destination on the route. |
Route colour | Displays using colours that are easy to understand and that stand out in daytime or nighttime colour mode. | |
Roads excluded from navigation | Select whether or not to exclude a road from navigation. Route SettingsHowever, if it is impossible to avoid a road that has been excluded, that road is displayed in a different colour from the original route. | |
Roads affected by traffic conditions | Any section of the road may be affected depending on the received traffic conditions. Roads affected by traffic conditions are displayed in a different colour, and a small icon representing the type of traffic condition is displayed at the side of the route. |

Traffic condition
Road sections affected by traffic conditions are displayed in a different colour on the map, and a small icon representing the type of traffic condition is displayed above the road. You can change the items displayed by setting the Traffic. Traffic
To check traffic conditions outside the
display, touch  . The
Traffic Summary screen is displayed.
. The
Traffic Summary screen is displayed.
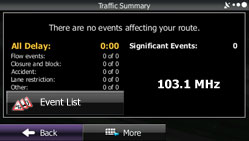
Touch  to open the following Event List screen.
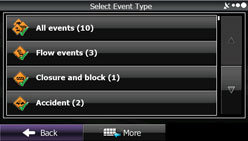
On this screen, you can select one entry from the list to view list of the traffic conditions for that section of the road.
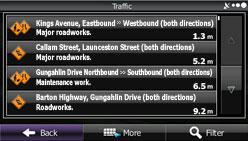
On this screen, you can select one entry from the list to view full details of the traffic conditions for that section of the road.
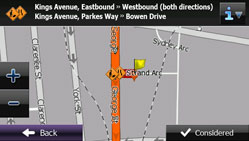
Touch  to open another screen displaying information
on the selected map position.
to open another screen displaying information
on the selected map position.
Motorway Services
When driving on the motorway, this displays information on the next three motorway service areas. By default, petrol stations, restaurants, rest rooms, and mechanics are displayed. You can change the items displayed by setting the Visual Guidance. Visual Guidance
When information is available for the
motorway service area,  is displayed.
Touch to display the motorway service area
information (distance, time needed, and services provided).
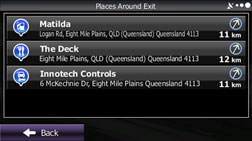
When you touch motorway service information, a list is displayed.
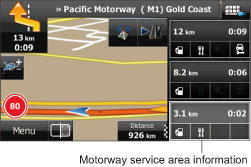
Select one from the list to display more details. You can check it on the map and set it as a waypoint or as a destination.
Smart zoom display
When the navigation screen is set to auto zoom, this function is turned on.
Touch  to display the control button.
Touch  to enlarge the display, and touch
  to reduce the display. When expanding
or reducing, the smart zoom function is switched off, and
to reduce the display. When expanding
or reducing, the smart zoom function is switched off, and  is displayed. Touch to turn on the smart zoom function.
If no operations are made for about 6 seconds, the previous screen is displayed.
Smart Zoom On
Smart Zoom Off
Map operations
You can touch a position on the map, and then check that position during navigation. The map's current position tracking function stops (the car marker (a blue arrow by default) is not fixed in position on the screen), and the control buttons are displayed allowing you to change the map display.

Operation | Button | Explanation |
|---|---|---|
Using drag & drop to move the map | No buttons | You can move the map in any direction you want by touching and holding the map, and moving your finger in the direction you want to move the map. |
Zoom in/Zoom out |
| Change the area of the map displayed on the screen. Road names and other characters are always displayed in the correct direction and at the same font size, and you only need to check necessary roads and icons. In 3D mode, the map cannot be reduced endlessly. The map changes to 2D mode if you zoom out beyond the defined amount. The display changes slowly if you tap the button, or changes in a smooth, continuous motion if you touch & hold the button. |
Tilt up/Tilt down |
| In 3D mode, you can change the vertical display angle of the map. The display changes slowly if you tap the button, or changes in a smooth, continuous motion if you touch & hold the button. |
Rotate left/Rotate right |
| Changes the horizontal display angle of the map. The display changes slowly if you tap the button, or changes in a smooth, continuous motion if you touch & hold the button. |
2D or 3D display |
| Touch this button to switch the map display mode between a 3D bird's-eye view and a flat 2D view. |
Compass in 2D or 3D map display mode |
| The compass direction indicates North. Touch this button to change to a North Up display, and then touch it again to return to the direction previously displayed. |
Point information |
| Touch this button to open another screen displaying information on the selected map position (cursor). |
Return to normal navigation |
| Touch this button to return the map to the current GPS position. Auto map rotation is also enabled. The map operation buttons are hidden, and navigation restarts. |
Additional functions |
| Touch this button to display the additional functions list. For example, saving the cursor to the destination list, and searching the area around the cursor. |
Selecting a destination |
| Touch this button to select the cursor as a new destination. The route is researched automatically. |
 /
/
 /
/
 /
/
 /
/
 /
/


Quick menu
Frequently used buttons and functions
used during navigation are all displayed on the Quick menu. Touch  to open directly from the Map screen.
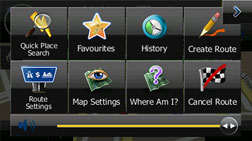
The menu closes if no operations are performed
for a few seconds, or if you touch  .
.
Touch another button to open a new screen displaying the option you selected.
You can assign functions to shortcuts from the Menu screen. See the following items for more details.
The following explains the buttons and functions displayed on this screen.
Button | Explanation | Primary Location |
|---|---|---|
| Touch this button to return to the Map screen. | N/A |
Guidance volume slider | Adjusts the guidance volume. This adjusts all volumes in the guidance volume adjustment application. | More / Settings / Sound and Warnings / Volume / Master slider Sound and Warnings |
| Touch this button to search around a point on the route, or your current position (when a route search has not been performed). | Find / Find Places / Quick Search Selecting the destination from your favourite spots (POI: Point Of Interest) |
| Touch this button to select an item from the destination list. | Find / Favourite Selecting the destination from the destination list |
| Touch this button to select previously set destinations from the history list. | Find / History Selecting a frequently used destination (Smart History) |
| Touch this button to change the route. | My Route / Create (Edit) Route Setting a new starting point for the route |
| Touch this button to change route related settings. | More / Settings / Route Settings Route Settings |
| Touch this button to change map related settings. | More / Settings / Map Settings Map Settings |
| Touch this button to display a special screen with a button that searches for information on your current position and determines the nearest emergency assistance or road-side assistance. See the following section for more details. | N/A |
| Touch this button to clear the route and cancel navigation. This button is available when only one destination is set. | My Route / Cancel Route Cancelling Route Navigation |
| Touch this button to remove the next waypoint from the route. When multiple destinations are set, the previous waypoint is displayed. This button is available when only two or more destinations are set. | N/A |


 /
/


In Settings, you can change the Quick menu buttons to use other functions. Customise Quick Menu The following functions are available.
Button | Explanation | Primary Location |
|---|---|---|
| Reduces the scale of the 2D map to display the entire route. | My Route / Overview Displaying the Entire Route on the Map |
| Opens the Visual Guidance settings screen. | More / Settings / Visual Guidance Visual Guidance |
| Opens the Traffic Summary screen. | Touch the navigation menu or the Map screen's road icons. |
| Avoids part of the recommended route. | My Route / Avoidances |
| Opens the trip monitor screen from which you can manage your saved trip logs and path logs. | More / Trip Monitor “More” Menu |
| Opens a list of changes in the route (distances). | Touch the top of the Map screen during navigation. |
| The route being navigated is saved to be used later. | My Route / More / Save Route |
| Changes to a saved, previously navigated route. | My Route / More / Load Route |
| Searches for your favourite spots using a variety of methods. | Find / Find Places Selecting the destination from your favourite spots (POI: Point Of Interest) |
| The Map screen opens and a simulation of the route being navigated starts. | My Route / More / Simulate Navigation Displaying a Simulation of the Route |
| Opens the GPS information screen showing satellite positions and signal strength. | Touch the top of the Map screen if there is no GPS reception. |


Check current position (Where Am I?)
You can open this function from the Quick menu. The button on this screen searches for information on the current position (if there is no GPS reception it uses the last confirmed position) and recommended spots in the area, and displays them on the screen.
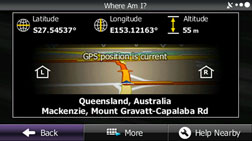
This screen provides the following information.
 ,
,  :
:
Latitude/Longitude (Current positional coordinates use the WGS84 land survey system)
 :
:
Altitude (Advanced information acquired by the GPS receiver - may not be accurate)
 :
:
Address of current position on left
 :
:
Address of current position on right
The latest location information is displayed in the centre of the screen, or the time after the latest information was acquired is displayed.
A detailed address (when available) for the current position is displayed at the bottom of the screen.
The following functions are also available on this screen.
Touch  to save the current position in the
destination list.
to save the current position in the
destination list.
You can also search for nearby help around
the current position. Touch  to open a new screen and perform a quick search.
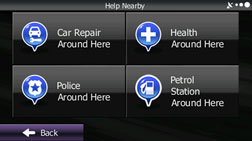
You can search for the following services around your current position or the latest confirmed position.
 :
:
Vehicle repairs / Road-side assistance services
 :
:
Hospitals / Emergency services
 :
:
Police stations
 :
:
Petrol stations
Touch a button and then select an item from the list to display the route navigation to the location.
