

Various Unit Settings

Displaying the Info screen
Display the Info screen to perform various settings.
Press
 .
.
Touch
 .
.
If
is not displayed, touch  .
.
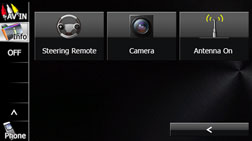
Touch the switch that you want to set.
Touch
 or
or  to change the Info screen.


 :
:
Display DivX VOD code. Displaying DivX VOD code
 :
:
Check the sensitivity of the GPS signal reception, or the connection of the parking and reverse signals. Display Connection Status Information
 :
:
View information such as the map data that is stored on the unit or version information for the audio application. Checking the Software Version
 :
:
Touch
to perform the various steering wheel
switches settings. About Steering Wheel Switches
 :
:
Touch
to perform the Back eye camera settings. Back Eye Camera Operations
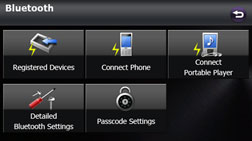
Bluetooth setting
Touch  to perform the various Bluetooth settings.
On the Info screen, touch
.
Touch the switch that you want to set.
Touch
 to return to the previous screen.
 :
:
Register or delete a Bluetooth device, or display information for connected devices. Registering a mobile phone, Registering a portable device
 :
:
Register a mobile phone or perform the connection settings. Connecting a mobile phone
 :
:
Register a Bluetooth audio device or perform the connection settings. Connecting a portable device
 :
:
Display or set the detailed Bluetooth information for this unit. Displaying Detailed Bluetooth Settings for the unit
 :
:
Set the passcode (passkey). Changing the passcode (passkey)
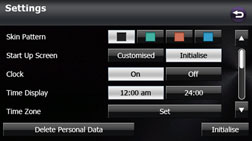
Skin pattern setting
You can set the colour pattern (Black/Green/Amber/Blue) for the screen.
On the Info screen, touch
 .
.
Touch the colour that you want to use as the skin pattern.
The setting changes to the colour pattern that you touched.
Touch
 to initialise your personal data and
all settings. Initialising Personal Data
to initialise your personal data and
all settings. Initialising Personal Data
Touch
 to return the settings in the Settings
screen to their initial values.
to return the settings in the Settings
screen to their initial values.
Opening screen setting
You can change the Opening screen to display the image of your choice. You can also display image data imported from an SD memory card on the Opening screen.
Changing the Opening screen
You can change the Opening screen of the unit (the screen that is displayed when the power is turned on).
On the Info screen, touch
.
Touch
 or on the Start Up Screen.
Touch
to change to the Opening screen that
was set with the picture function. Using the Picture Function
Touch
to return the settings in the Start
Up screen to their initial values.
Touch
to initialise your personal data and
all settings. Initialising Personal Data
Touch
to return the settings in the Settings
screen to their initial values.
Clock setting
You can turn the clock display on or off, change the time display, and set the time zone.
On the Info screen, touch
.
Touch
 or
or  in Clock.
Touch
to initialise your personal data and
all settings. Initialising Personal Data
Touch
to return the settings in the Settings
screen to their initial values.
Time display setting
On the Info screen, touch
.
Touch
 or
or  in Time Display.
Touch
to initialise your personal data and
all settings. Initialising Personal Data
Touch
to return the settings in the Settings
screen to their initial values.
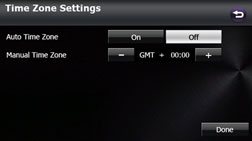
Time zone setting
On the Info screen, touch
.
Touch
 in Time Zone.
Touch
or in Auto Time Zone.
Touch
in Auto Time Zone to set the time zone
automatically.
When Auto Time Zone is “Off”, touch
 or
or  in Manual Time Zone to adjust the time
zone manually.
in Manual Time Zone to adjust the time
zone manually.
Touch
for 1 second or more to advance the
time continuously.
Touch
for 1 second or more to reverse the
time continuously.
After configuring the setting, touch
 to save the setting and return to the
previous screen.
to save the setting and return to the
previous screen.
On the Settings screen, touch
to initialise your personal data and all settings. Initialising Personal Data
On the Settings screen, touch
to return the settings in the Settings screen to their initial
values.
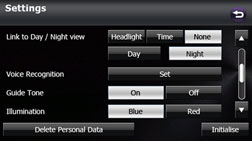
Day/night view changeover setting
On the Info screen, touch
.
Touch
 ,
,  or
or  in Link to Day/Night View.
If Link to Day/Night View is not displayed, touch
 to change the page.
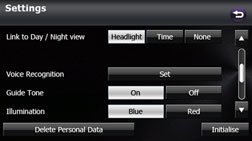
- :
Change to night view when the lights (sidelights, tail lights, license plate lights) are turned on.
- :
Change to night view or day view at the set times.
- :
Change to night view or day view manually.
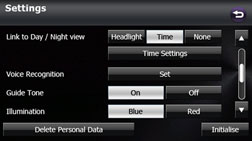
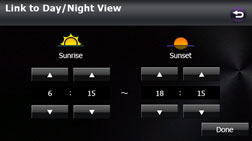
Day/night view changeover time setting
When Link to Day/Night View is set to “Time”, you can set the time at which to change to the day view.
On the Settings screen, touch
in Link to Day/Night View.
Touch
 .
.
Touch
 or .
or .
You can set the “Sunrise” and “Sunset” time for the day view.
After configuring the setting, touch
to save the setting and return to the
previous screen.
On the Settings screen, touch
to initialise your personal data and all settings. Initialising Personal Data
On the Settings screen, touch
to return the settings in the Settings screen to their initial
values.
Changing to the night view or day view
When Link to Day/Night View is set to “None”, you can change to the night view or day view manually.
On the Settings screen, touch
in Link to Day/Night View.
Touch
 or
or  .
.
Touch
to initialise your personal data and
all settings. Initialising Personal Data
Touch
to return the settings in the Settings
screen to their initial values.
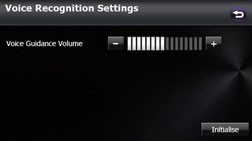
Voice recognition setting
You can set the volume of the voice recognition.

Be sure to set the volume of the audio at an appropriate level. Improper volume setting may result in hearing damage or a traffic accident.
On the Info screen, touch
.
Touch
in Voice Recognition.
If Voice Recognition is not displayed, touch
to change the page.
Touch
or .
- (right side):
Volume up
- (left side):
Volume down
On the Settings screen, touch
to initialise your personal data and all settings. Initialising Personal Data
Touch
to return the settings in the different
screens to their initial values.
Guide tone setting
You can set the sound for switch operations to on or off.
On the Info screen, touch
.
Touch
or in Guide Tone.
If Guide Tone is not displayed, touch
to change the page.
When Guide Tone is set to “Off”, switch operations do not emit a sound.
Touch
to initialise your personal data and
all settings. Initialising Personal Data
Touch
to return the settings in the Settings
screen to their initial values.
