

Fujitsu Ten ECLIPSE OWNER'S MANUAL / CD3200


-

-

-

-

-

-

-

-

-

-
Setting the Bluetooth hands-free function
- Displaying the Phone Setting selection mode
- Registering a cell phone
- Delete a registered cell phone
- Connecting a registered cell phone
- Disconnecting a cell phone
- Registering phone number in the phonebook
- Setting Auto Answer
- Setting the ring tone
- Setting Auto Answer for registered cell phones
- Displaying device information for the main unit
- Enabling phone numbers to be input directly
- Deleting data
- Changing the passcode
-

-

-

-

-

-

-

-

-

-

-

-

-

-


Bluetooth hands-free
Setting the Bluetooth hands-free function
A variety of settings that can be used when operating the cell phone can be made from the Bluetooth hands-free Phone Setting mode.
Registration setting:
To register a cell phone.Select Phone setting:
To select a registered cell phone, and connect, disconnect, or delete it.Phone Book setting:
To store data from the phonebook of the cell phone in the phonebook of the main unit.Auto Answer setting:
To set the cell phone to Auto Answer.Ring tone setting:
To set the ring tone.Auto Connect setting:
To connect a registered cell phone.Device INFO display setting:
To display device information for the main unit.Dial setting:
To enable a phone number to be input using the main unit.Delete setting:
To delete data from the incoming/outgoing call history, preset dial, or phonebook of the main unit.Change Code setting:
To change the passcode.
Displaying the Phone Setting selection mode
 Press the [
 /MENU] button
for more than one second.
/MENU] button
for more than one second.
The MENU selection mode is displayed.
 Press the [SELECT] (Up/Down) button to select FUNC.
 Press the [ENTER] button.
 Press the [SELECT] (Up/Down) button to select Phone Setting.
 Press the [ENTER] button.
Phone Setting selection mode is activated.
Registering a cell phone
Cell phones can be registered in the main unit. There are two methods that can be used to register a cell phone in the main unit.
The cell phone itself can be used or search for cell phones using the main unit. A maximum of five cell phones can be registered in the main unit. Priority of connection will always be in sequential order from 1 to 5. As cell phones are added and deleted, the order will always go by the numbered sequence.
Registering using a cell phone
If a cell phone is currently connected, it must be disconnected prior to registration of additional cell phones.
Press the [SELECT] (Up/Down) to select Registration within the Phone
Setting mode.
Press the [ENTER] button.

- NO ENTRY will be displayed if available. If not, a double beep will be heard if the phone registration memory is not available or full.
Press the [SELECT] (Up/Down) button to select Allow Connect.
Press the [ENTER] button.
The "Waiting" message appears on the display.
Use the cell phone to input the passcode.
The default passcode is 1234.
For details on how to operate the cell phone, read its instruction manual.
Be sure to perform the registration of the cell phone only while the "Waiting" message is on the display.
 When the registration has been completed, the "COMPLETED" message
appears on the display.
When the registration has been completed, the "COMPLETED" message
appears on the display.
The cell phone is now
registered to the main unit( and
and  appear on the display.)
If the registration has not been successfully completed, the "FAILED" message appears on the display. Repeat the registration procedure.
To register another cell phone to the main unit, press the [RTN/BAND] button twice after Step 6. Perform the registration procedure from the registered cell phone selection mode in Step 1.
You cannot register a cell phone that has already been registered.
The hands-free function and the audio function of the cell phone can be connected at the same time for some cell phones.
Searching for cell phones to be registered
Press the [SELECT] (Up/Down) to select Registration within the Phone
Setting mode.
Press the [ENTER] button.
- NO ENTRY will be displayed if available. If not, a double beep will be heard if the phone registration memory is not available or full.
Press the [SELECT] (Up/Down) button to select Device Search.
Press the [ENTER] button.
"Searching" will be displayed.
- "FAILED" will be displayed if cell phone cannot be registered. Repeat Search procedure.
Press the [SELECT] (Up/Down) button to select the device name of
the cell phone you want to register.
- Each time the [SCREEN/TEXT] button is pressed, the display changes in the following way, and you can register the cell phone using the device address (BD ADD) as well.
- Device name ↔ Device address (BD ADD)
- If the device name cannot be obtained during the search, "UNKNOWN" is displayed.
Press the [ENTER] button.
"Waiting" will be displayed.
 Use the cell phone to input the passcode.
The default passcode is 1234.
 When the registration has been completed, "COMPLETED" will be displayed.
The cell phone is now
registered.( and  appear on the display.)
"FAILED" will be displayed if registration is not successful. Repeat Search procedure.
Delete a registered cell phone
Press the [SELECT] (Up/Down) button while in the Phone Setting selection
mode to select Select Phone.
Press the [ENTER] button.
Press the [SELECT] (Up/Down) button to select cell phone to be deleted.
Press the [ENTER] button.
Press the [SELECT] (Up/Down) button to select Delete.
Press the [ENTER] button.
The "Delete ?" message appears on the display to confirm the cancellation.
Press the [ENTER] button.
"COMPLETED" will be displayed when deletion is successful.
- When a cell phone is deleted, all data associated will also be deleted (including history, preset dial, and phonebook) from the main unit.
Connecting a registered cell phone
Press the [SELECT] (Up/Down) button while in the Phone Setting selection
mode to select Select Phone.
Press the [ENTER] button.
Press the [SELECT] (Up/Down) button to select the cell phone to be
connected.
Press the [ENTER] button.
Press the [SELECT] (Up/Down) button to select Connect.
Press the [ENTER] button.
The "Waiting" message appears on the display.
"COMPLETED" will be displayed.
The cell phone is now connected to the main unit.
( and
and  appear on the display.)
"FAILED" will be displayed if registration is not successful. Repeat the connection procedure.
- Cell phones that have not been registered cannot be connected.
Disconnecting a cell phone
Press the [SELECT] (Up/Down) button while in the Phone Setting selection
mode to select Select Phone.
Press the [ENTER] button.
Press the [SELECT] (Up/Down) button to select the cell phone to be
disconnected.
Press the [ENTER] button.
Press the [SELECT] (Up/Down) button to select Disconnect.
Press the [ENTER] button.
The "Disconnect ?" message appears on the display to confirm the disconnection.
Press the [ENTER] button.
"COMPLETED" will be displayed when disconnection is successful.
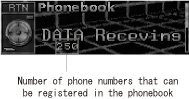
Registering phone number in the phonebook
Phone numbers can be registered in the phonebook of the main unit by transferring the phonebook data from the cell phone.
A maximum of 500 phone numbers can be registered for each cell phone.
Press the [SELECT] (Up/Down) button while in the Phone Setting selection
mode to select Phonebook.
Press the [ENTER] button.
The "DATA Receiving" message appears on the display.
Transmit phonebook data using your cell phone.
"COMPLETED" will be displayed when data transfer is successful.
"FAILED" will be displayed if data transfer is not successful. Repeat the transmit procedure.
If there is no space remaining in the main unit for phonebook data, the "MEMORY FULL" message appears on the display when an attempt is made to transfer data from the cell phone.
Some cell phones cannot transfer all of the phonebook data at once. In this case, transfer one data at a time.
If the battery terminal of the vehicle is disconnected, the phonebook data registered in the main unit will be deleted.
Setting Auto Answer
When there is an incoming call, the phone can be set to answer it automatically five seconds after the phone starts ringing.
Press the [SELECT] (Up/Down) button while in the Phone Setting selection
mode to select Auto Answer.
Press the [ENTER] button.
Press the [SELECT] (Up/Down) button to select ON or OFF.
ON:
Auto
Answer is activated
OFF:
Auto
Answer is disabled
- The default setting for Auto Answer is OFF (Auto Answer is disabled).
Setting the ring tone
The ring tone can be set on or off for incoming calls. Ring tone is set ON by default.
Press the [SELECT] (Up/Down) button while in the Phone Setting selection
mode to select Ring Tone.
Press the [ENTER] button.
Press the [SELECT] (Up/Down) button to select ON or OFF.
Setting Auto Answer for registered cell phones
Cell phones which have been registered to the main unit will be connected automatically, if the main unit and the Bluetooth are in an area where connection is possible.
Auto answer is set ON by default and may not be available for all cell phones.
Press the [SELECT] (Up/Down) button while in the Phone Setting selection
mode to select Auto Connect.
Press the [ENTER] button.
Press the [SELECT] (Up/Down) button to select ON or OFF.
ON:
Connects
automatically.
OFF:
Must
be connected manually.
Displaying device information for the main unit
The name of the device (ECLIPSE BT), the passcode (default setting - 1234), and the BD ADD (device address) can be displayed.
Press the [SELECT] (Up/Down) button while in the Phone Setting selection
mode to select Device INFO.
Press the [ENTER] button.
The name of the device and Passcode will be displayed. Pressing the [SCREEN/TEXT] button will toggle between Passcode and BD ADD.
Enabling phone numbers to be input directly
The default setting is OFF.
Press the [SELECT] (Up/Down) button while in the Phone Setting selection
mode to select Dial Setting.
Press the [ENTER] button.
Press the [SELECT] (Up/Down) button to select ON or OFF.
Deleting data
Phonebook, Call History, Preset Dial, and All Data can be deleted.
- If there is no cell phone connected, the data in the phonebook cannot be deleted.
Deleting data from the phonebook
Press the [SELECT] (Up/Down) button while in the Phone Setting selection
mode to select Delete.
Press the [ENTER] button.
Press the [SELECT] (Up/Down) button to select Phonebook.
Press the [ENTER] button.
Press the [SELECT] (Up/Down) button to select ALL, a name, or a phone
number.
ALL:
Deletes
entire phonebook.
Name or
phone number:
Only the selected data is deleted.
Press the [ENTER] button.
If ALL is selected "DELETE?" and "ALL" will be displayed.
If a name or phone number is selected "DELETE?" and the name or phone number will be displayed.
Press the [ENTER] button.
When the data in the phonebook has been deleted, "COMPLETED" will
be displayed.
Deleting call history
Press the [SELECT] (Up/Down) button while in the Phone Setting selection
mode to select Delete.
Press the [ENTER] button.
Press the [SELECT] (Up/Down) button to select Outgoing Calls or Incoming
Calls.
Outgoing
Calls:
Outgoing call history
Incoming
Calls:
Incoming call history
Press the [ENTER] button.
If Outgoing Calls is selected "DELETE?" and "Outgoing Calls" will be displayed.
If Incoming Calls is selected "DELETE?" and "Incoming Calls" will be displayed.
Press the [ENTER] button.
When the data in the call history has been deleted, "COMPLETED" will
be displayed.
Deleting preset dial
Press the [SELECT] (Up/Down) button while in the Phone Setting selection
mode to select Delete.
Press the [ENTER] button.
Press the [SELECT] (Up/Down) button to select Preset Dial.
Press the [ENTER] button.
"DELETE?" and "Preset Dial" will be displayed.
Press the [ENTER] button.
When the data in preset dial has been deleted, "COMPLETED" will be
displayed.
Deleting all data
Press the [SELECT] (Up/Down) button while in the Phone Setting selection
mode to select Delete.
Press the [ENTER] button.
Press the [SELECT] (Up/Down) button to select ALL.
Press the [ENTER] button.
"DELETE?" and "ALL" will be displayed.
Press the [ENTER] button.
When the data has been deleted, "COMPLETED" will be displayed.
Changing the passcode
The passcode for the main unit can be changed. 4 to 8 digits must be used. The default setting is 1234.
Press the [SELECT] (Up/Down) button while in the Phone Setting selection
mode to select Change Code.
Press the [ENTER] button.
Passcode and "0*******" will be displayed.
Press the [SELECT] (Up/Down) button to input numbers between 0 and
9.
Up:
Increases
the number.
Down:
Decreases
the number.
Press the [SELECT] (Right/Left) button to move the cursor.
Right:
The
cursor moves to the right.
Left:
The
cursor moves to the left.
Repeat Steps 3 and 4 to input the passcode to enter the next digit.
Press the [ENTER] button when you have input the passcode.
"NewPasscode?" will be displayed.
Press the [ENTER] button.
"COMPLETED" will be displayed.


