

Navigation Details Setting Screen

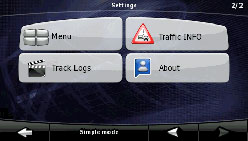
Settings menu
You can configure the program settings, and modify the behavior of Navigation. Touch the following switches: [Menu], [Settings]
The
Settings menu has two pages of submenus. Touch  to access the other options.

Touch switch | Description | Reference |
|---|---|---|
[Map Screen] | You can fine-tune the appearance and content of the Map screen. | |
[Route Planning] | These settings determine how routes will be calculated. | |
[Navigation] | You can control how Navigation behaves during navigation. | |
[Sound] | You can adjust the voices of Navigation. | |
[Regional] | These settings allow you to customize the application for your local language, measurement units, time and date settings and formats, as well as to choose the voice guidance profile you prefer. | |
[Warnings] | You can enable some useful warnings, and disable the touch screen in a moving vehicle with Safety Mode. | |
[Menu] | You can modify the look and behavior of the Menu screens. | |
[Track Logs] | You can set up automatic Track Log saving and fine-tune related settings. | |
[Traffic INFO] | You can check connecting information of SIRIUS Traffic. | |
[About] | This screen has no navigation feature. It merely provides information about the maps and licenses included with your navigation system. | None |
[Simple Mode] | You can switch to Simple Mode. In Simple Mode only a few of the above settings are available. The remaining settings are set to the optimal values for typical use. |
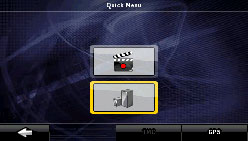
Quick Menu
The
Quick menu is a selection of controls that are frequently needed during
navigation. It is opened from the Map screen. Touch the following
switches on the map:
Touch the switch in the Quick menu to start the Map screen immediately. Switches are on when lit up.
Name | Main function (single touch) | Function (touch and hold) |
|---|---|---|
 | 3D buildings can be displayed on the map. Use this switch to suppress them temporarily. | Opens 3D settings. |
 | Turn Track Logs on and off. This function can also be controlled from the Manage Track Logs screen. | Opens Manage Track Logs screen. |
[GPS] | Opens the GPS Data screen, which includes satellite information, data coming from the GPS receiver, and a shortcut to the GPS Setting screen if needed. | No action |
[TMC] | When a SIRIUS Traffic receiver is connected to Navigation, this switch opens the list of Traffic messages. | No action |
Route menu
Save, load and edit your routes. Touch the following switches: [Menu], [Route]
Touch switch | Description | Reference |
|---|---|---|
[Route Info] | Opens a screen with useful route data. | |
[Itinerary] | You can browse the driving instructions that Navigation follows during navigation. You can exclude maneuvers or streets to adjust the route to your preferences. | |
[Edit Route] | Modify routes: Delete route points or modify their order. | |
[Load Route] | You can load a previously saved route for navigation. | |
[Save Route] | You can save the active route for later use. | |
[Delete Route] | You can delete the active route and all the route points (start point, via points, and destination). If you later decide that you need the same route, you will have to rebuild it from scratch. | |
[Settings] | Opens the Route settings screen with controls to modify the road types used for route calculation and the route calculation method. | |
[Fly Over] | You can run a demonstration of the route at high speed. | |
[Simulate] | You can run a demonstration of the route at normal speed. |
Management menu
You can manage the content that this unit stores. Touch the following switches: [Menu], [Manage]
Touch switch | Description | Reference |
|---|---|---|
[Save Routes] | Renaming or deleting saved routes | |
[Track Logs] | Recording, simulating, renaming or deleting Track Logs, assigning them a color to be shown on the map | |
[POI] | Creating, updating or deleting POIs Creating, updating or deleting POI groups Modifying POI visibility setting | |
[History] | Deleting histories | |
[Favorites] | Renaming or deleting Favorites | |
[Saved Search Criteria] | Creating, renaming or deleting saved search criteria | |
[User Data Management] | You can manage the data you have saved and the settings you have made in the program. |
User data management
You can manage settings implemented for saved data (Pins, POI, Favorites, History, and Track Logs) and programs. Touch the following switches :[Menu], [Manage], [User Data Management]
Touch switch | Description |
|---|---|
[Remove Pins] | You can add Pins to locations on the map using the [Place Pin] switch from the Cursor menuCursor menu. Touch this switch to remove all Pins from the map. |
[Back Up User Data] | All user data and the current settings will be saved on the inserted memory card. There is always one backup file. If you perform a backup later, the previous backup will be overwritten with the new information. |
[Restore User Data] | All user data and settings will be overwritten with the information stored in the backup file. Data and settings created after the latest backup will be lost. |
[Delete User Data] | All user data will be deleted, and settings will return to their factory defaults. This unit will restart. |
[Reset All Settings] | All settings will return to their factory defaults, but no user data will be deleted. This unit will restart. |
Map screen settings
You can fine-tune the appearance and content of the Map screen. Touch the following switches: [Menu], [Settings], [Map Screen]
Touch switch | Description |
|---|---|
[3D Settings] | Use 3D settings to determine which of the present 3D objects are shown on the map, and adjust the level of 3D visual detail. The options are as follows:
|
[Color Profiles] | Navigation is able to show the map and the menus in different colors during the day and night. Select the color profiles to be used in each mode, and the daytime and night color profiles interlock lighting and lighting out of vehicle. |
[Elevation on 2D Map] | You can display 3D information on 2D map. These top-down maps can display elevation by colors and shading. |
[Street Names During Navigation] | Street names and POI icons can get in the way on the map during navigation. With this switch you can suppress these map elements when Navigation is following your position on the map. If you move the map, both the street names and POI icons reappear immediately. |
[Lane Information] | Some maps contain lane information to help you position your car in the upcoming intersection. This setting tells Navigation whether to display this information at the top or at the bottom of the map. You can prevent the display of lane information. |
Route planning option
These settings determine how routes will be calculated. Touch the following switches: [Menu], [Settings], [Route Planning]
Touch switch | Description |
|---|---|
[Road Types Used for Route Planning] | To make the route fit your needs, you can also set which road types are, where possible, to be considered for and excluded from the route. Excluding a road type is a preference. It does not necessarily mean total prohibition. If your destination can only be accessed using some of the excluded road types, they will be used but only as much as necessary. In this case a warning icon will be shown on the Route Information screen, and the part of the route not matching your preference will be displayed in a different color on the map. |
[Route Calculation Method] | You can choose from different route types. The routing method can be changed temporarily while creating the route: When selecting the destination, touch [Routing Methods] in the Cursor menu. Touch [Routing Methods]. |
[Use Traffic Information] | When traffic messages are received, this setting tells Navigation whether to use that information in route planning. |
[Recalculate To Avoid Traffic] | This setting determines how Navigation uses the received Traffic information in route recalculation:
|
Road Types Used for Route Planning:
Type | Description |
|---|---|
[Unpaved Roads] | Navigation excludes unpaved roads by default: Unpaved roads can be in a bad condition and usually you cannot reach the speed limit on them. |
[Highways] | You might need to avoid highways when you are driving a slow car or you are towing another vehicle. |
[Ferries] | Navigation includes ferries in a planned route by default. However, the map does not necessarily contain information about the accessibility of temporary ferries. You might also need to pay a fare on ferries. |
[Cross-border Planning] | In some cases the route calculated according to your other navigation and route preferences will lead through another country. If you wish to always stay within the same country, turn this option off. |
[Permit Needed] | You might need a permit or permission from the owners to use certain roads or to enter certain areas. Navigation excludes these roads from the route calculation by default. |
[Pre-use Toll] | By default Navigation includes toll roads (pay roads where there is a per-use charge) in the routes. If you disable toll roads, Navigation plans the best toll-free route. |
[Period Charge] | Charge roads are pay roads where you can purchase a pass or vignette to use the road for a longer period of time. They can be enabled or disabled separately from toll roads. |
[Carpool/HOV] | This control appears only when navigating in the USA. You should check whether you are allowed to use carpool lanes before enabling this road type. |
Route calculation methods:
Option | Description |
|---|---|
Fast | Gives the quickest possible route if you can travel at or near the speed limit on all roads. Usually the best selection for fast and normal cars. |
Easy | Results in a route with fewer turns. With this option, you can make Navigation take, for example, the freeway instead of series of smaller roads or streets. |
Economical | Look for trade off of speed and shortness with cost. Navigation calculates as if it were calculating the Fast route, but it takes other roads as well to save on fuel costs. |
Short | Gives a route that has the smallest total distance of all possible routes between the route points. |
Navigation settings
You can control how Navigation behaves during navigation. Touch the following switches: [Menu], [Settings], [Navigation]
Touch switch | Description |
|---|---|
[Keep Position on Road] | This feature allows car drivers to always correct GPS position errors by matching the vehicle position to the road network. By turning off this feature, you also turn off the GPS position error filtering. The position shown on the map will be subject to all position errors and position fluctuations. |
[Off-route Recalculation] | This switch tells Navigation whether to automatically recalculate the route when you deviate from it. When this feature is switched off, it is necessary to start route recalculation manually. Otherwise, navigation will stop until you return to the recommended route. Setting a point other than the current GPS position as the start point of the active route will automatically disable this feature. |
[Restore Lock-to-Position] | If you have moved or rotated the map during navigation, this feature moves the map back to your current GPS position and re-enables automatic map rotation after the given period of inactivity. |
[Automatic Overview] | This feature switches the map view to Overview mode when the next route event is far away. Overview is a zoomed out 2D view to let you see the surrounding area. You have the following controls for Automatic Overview:
|
Regional settings
These settings allow you to customize the application for your local language, measurement units, time and date settings and formats, as well as to choose the voice guidance profile you prefer. Touch the following switches: [Menu], [Settings], [Regional]
Touch switch | Description |
|---|---|
[Program Language] | This switch displays the current written language of the Navigation user interface. By touching the switch, you can select a new language from the list of available languages. Changing this setting causes the application to restart. Be aware of this before you make the change. |
[Voice Profile] | This switch displays the current voice guidance profile. By touching the switch, you can select a new profile from the list of available languages and speakers. Touch any of these to hear a sample voice prompt. Just touch OK when you have selected the new spoken language. |
[Units] | You can set the distance units to be used by the program. Navigation may not support all the listed units in some voice guidance languages. If you select a measurement unit not supported by the chosen voice guidance language, a warning message will appear. |
[Set Date & Time Format] | You can set the data and time format. A variety of international formats are available. |
[Time and Time Zone Settings] | You can access time and time zone settings. Navigation helps you with correcting the device time to ever accurate GPS time. Navigation can also help you set the time zone based on your current GPS position. |
Time and Time Zone Settings
Touch switch | Description |
|---|---|
[Auto Time Correction to GPS] | Use this feature to synchronize the clock of your device to the highly accurate time provided by the GPS receiver. |
[Use Auto Time Zone] | Use this feature to synchronize the time zone of the clock of your device to the time zone based on your current GPS position. This is useful if you travel abroad. |
[Set Time Zone] | Set time zone manually if you do not want to synchronize the time zone automatically. This allows you to use Auto Time Correction and apply a time zone offset to obtain the desired time. |
The clock function of this unit interlocks GPS signal.
The clock may be out of order when not receiving GPS signal.
Warning settings
You can enable some useful warnings, and disable the touch screen in a moving vehicle with Safety Mode. Touch the following switches: [Menu], [Settings], [Warnings]
Touch switch | Description |
|---|---|
[Warn When Speeding] | Maps may contain information about the speed limits of the road segments. Navigation is able to warn you if you exceed the current limit. This information may not be available in your district (ask your local dealer). Also, this information may not be completely accurate for all roads on the map. This setting lets you decide whether you wish to receive the warnings. You can set the relative speeding level at which the application warns you (100% represents the current speed limit):
|
[Speed Camera Warning] | This feature allows you to receive a warning when approaching a Road Safety Camera. You must ensure on your own liability that using this feature is legal in the country where you intend to use it. The options are as follows:
|
[Safety Mode] | Safety Mode disables the touch screen above 10 km/h (6 mph) to keep your attention on the road. While driving, you will not be able to set a new destination or change settings. The only screen control that remains enabled is the gesture that puts you back on the Map screen. |

Menu settings
You can modify the look and behavior of the Menu screens. Touch the following switches: [Menu], [Settings], [Menu]
Touch switch | Description |
|---|---|
[Animation] | You can activate and deactivate the Menu animations. When animation is turned on, switches on Menu and keyboard screens are animated. |
[Background] | You can choose the image to be used as the menu background image. |
Track log settings
You can set up automatic Track Log saving and fine-tune related settings. Touch the following switches: [Menu], [Settings], [Track Logs]
Touch switch | Description |
|---|---|
[Update Interval] | This determines how often track points will be saved. Position information is normally received once a second from the GPS. If you do not need such a detailed log, you can increase this number to save Track Log space. |
[Enable Auto-saving] | When auto-saving is enabled, you do not need to turn Track Log saving on and off manually. Navigation will automatically start recording the Track Log as soon as GPS position is available. |
[Track Log Database Size] | This figure shows how much memory is used by the automatically saved Track Logs. |
[Track Log Max. Size] | You can set the maximum database size for the automatically saved Track Logs. When the limit is reached, the oldest automatically saved Track Logs will be deleted. |
[Create NMEA/SIRF Log] | Independently of the normal Track Log, you can instruct Navigation to record the native GPS data received from the GPS device. This information is saved as a separate text file on the memory card and cannot be played back by Navigation. |
TMC settings
You can set up the connection to the SIRIUS Traffic receiver. Touch the following switches: [Menu], [Settings], [Traffic INFO]
Safety Mode settings
This feature is available in Advanced mode only.
Touch the following switches: [Menu], [Settings], [Warnings], [Safety Mode]
Trip information screen
The Trip information screen has both route and travel data you might need during your journey. It can be opened directly from the Map screen by touching the Trip Data field.
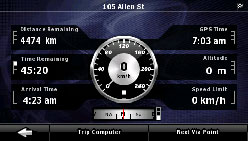
The fields on this screen are continuously updated while the screen is open.
When you open the screen, all route data fields contain information about reaching your final destination. Touch [Next Via Point] to have the fields relating to your route display data for the next via point. Touch the switch repeatedly to toggle between the two options.
You have the following data and functions on this screen:
Name | Description | Function |
|---|---|---|
  | Shows whether the route data fields are displaying information about the final destination (checkered flag) or about the next via point (yellow flag). | None |
Field next to the flag | Shows the name or number of the current street or road. | None |
Turn Preview | Shows the type and distance of the next route event. | None |
Compass | Shows the current heading. | Touch this field to show it on the Map screen in one of the Trip Data fields. |
Speedometer | Shows the current speed both graphically and as a number. | Touch this field to show it on the Map screen in one of the Trip Data fields. |
Distance Remaining | Shows distance remaining to final destination. | Touch this field to show it on the Map screen in one of the Trip Data fields. |
Time Remaining | Shows the time needed to reach the final destination of the route based on information available for the remaining segments of the route. The calculation cannot take into account traffic jams and other possible delays. | Touch this field to show it on the Map screen in one of the Trip Data fields. |
Arrival Time | Shows the estimated arrival time at the final destination of the route based on information available for the remaining segments of the route. The calculation cannot take into account traffic jams and other possible delays. | Touch this field to show it on the Map screen in one of the Trip Data fields. |
GPS Time | Shows the current time corrected with time zone offset. The accurate time comes from the GPS satellites, and the time zone information either comes from the map or is set manually in Regional settings. | Touch this field to show it on the Map screen in one of the Trip Data fields. |
Altitude | Shows elevation if it is provided by the GPS receiver. | Touch this field to show it on the Map screen in one of the Trip Data fields. |
Speed Limit | Shows the speed limit of the current road if the map contains it. | Touch this field to show it on the Map screen in one of the Trip Data fields. |
Trip Computer | Opens a new screen with three resettable Trip Computers. | |
Next Via Point | Touch this switch to change the content of the Route Data fields to show information about the next via point. If you touch the previous switch, this one replaces it. | |
[Destination] | Touch this switch to have the Route Data fields show information about the final destination again. |
Most of the fields on this screen have a symbol next to them. This symbol shows whether the field it is attached to is shown on the map as Trip Data. It also shows the position of the data as follows:
Symbol | Description |
|---|---|
 | This value is not shown on the Map screen. |
 | This value appears on the Map screen in the Trip Data area. This is the value at the top. |
 | This value appears on the Map screen in the Trip Data area. This is the value in the middle. |
 | This value appears on the Map screen in the Trip Data area. This is the value at the bottom. |
Trip computer screen
The Trip computer screen provides collected trip data. Touch [Trip Computer] on the Trip information screen to open the Trip computer screen.
The fields on this screen are continuously updated while the screen is open.
You can switch between trips, pause and resume a trip, or reset.
You have the following functions on this screen:
Name | Description |
|---|---|
[Pause] | Pauses the trip currently shown on the screen. Values on the screen stop changing. |
[Reset] | Resets all counters of the currently shown trip. The collection of trip data is restarted only when Navigation receives a position from the GPS. |
  | Cycles through all trips. |

If the vehicle's battery is disconnected (for repairs to the vehicle or for removing this unit), all the Trip Computer history (Average Speed, Total time, etc) in the memory will be lost.
