AVN2227P > Names of Controls > Detaching the PND
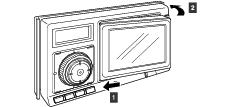
Detaching the PND
![]()
Using the PND
The navigation function can still be used even if the PND is detached from the main unit.
How to Detach the PND from the Main Unit
1.
Press the [Release] button.
The right end of the PND detaches from the body of the main unit.
2.
Remove the PND.
Hold the PND on the right side, lift up and pull it toward you to remove it.


• When the PND is removed, do not touch the back of it.
• After detaching the PND, fit the connector cover onto the back of it.
• Do not attach the PND to the main unit while the connector cover is still fitted to the PND.
• When attaching the PND, do not press the monitor display.
• If the PND gets wet, do not attach it to the main unit.
• After removing the PND from the main unit, it is recommended that you use the optional Audio Cover which comes with TRK-107p* to prevent the connector from stain.
* TRK-107p: Sold separately
* TRK-107p: Sold separately
How to Insert the PND
1.
Insert the left end of the PND into the main unit.
Engage the catch at the left end of the PND with the lock on the main unit.
2.
Insert the PND.
Press the right end of the PND until it clicks into place.